ViTrains Drive Components
Remove the plastic body from the ViTrains Class 47 locomotive by gently easing the body sides out to disengage the lateral grooves on the chassis, as per the instruction sheet supplied with the loco.
Unsolder the wires connecting to the bogies and motor (3 green, 3 black) from the Printed Circuit Board (PCB) on the ViTrains chassis.
Unscrew the 4 black screws and remove the PCB.
Remove the motor and its rubber mounting block.
Unclip the bogies by gently pressing on the raised clip which engages in the curved slot in the chassis. Take care with this step as the clip can break if bent excessively.
Set aside the two bogies and motor with their wires attached. All other parts of the loco can be discarded.
Bogie Sideframe Assembly
Unclip the keeper plate/sideframe assembly from the underside of each bogie. There are clips at each end and on each side between the wheels.
Using a fine-bladed razor saw, or similar, cut off the dummy Class 47 sideframes flush with the insides of the sideframes, as per photo below. Also cut the smaller attachment points at the ends of the keeper plate. Discard the dummy Class 47 sideframes.
 |
| Cut lines to remove dummy Class 47 sideframes. |
Remove the support structure and clean up the 3D-printed bogie sideframes.
Remove the central "sprue" from the bogie sideframes as per the diagram below. The cut lines are highlighted below in yellow. Also cut away the raised section, highlighted in red, where the sprue is attached to the end "traction motor". Part of the "sprue" is (optionally) reattached later, to represent the traction motors.
 |
| Cut lines for 3D-Printed Sideframes |
Optionally, the parts of the previously-removed "sprue" can be fitted to the underside of the keeper plate to provide a representative profile of the traction motors, when the finished loco is viewed side on at track level.
At this stage, the central joining piece (highlighed in red, below) can be left intact. Position the two "traction motors" aligned with the matching notches in the ViTrains bogie. Orientation is not important. Carefully, drill two 0.8 mm holes through the holes in the "traction motors" for 1 mm dia. x 3 mm long fixing screws. After drilling the holes, remove the central joining piece and attach the individual "traction motors". Don't use screws longer than 3 mm as clearance is needed for the gears.
 |
| Adding dummy "Traction Motors" to Keeper Plate |
Reassemble the keeper plate to the ViTrains bogie. The orientation of the keeper plate is important at this stage. Each of the "traction motors" should be inboard of its respective axle. The orientation will be correct if the keeper plate and bogie are orientated as per the photos above and below.
If the wheels fell out previously, ensure that the power collection wires are correctly located in the grooves on the inside faces of the wheels.
 |
| ViTrains Bogie after Reassembly |
Attach the 3D-printed sideframe to the ViTrains bogie, from below. First, insert the end of the bogie (closest to the brass shaft coupling) into the dummy "traction motor" recess on the end of the 3D-printed sideframe. Gently spread the 3D-printed sideframe apart to allow the projections on the ViTrains bogie to engage in the rectangular holes on the inside of the 3D-printed sideframe.
 |
| Fitting 3D-Printed Sideframes to ViTrains Bogie |
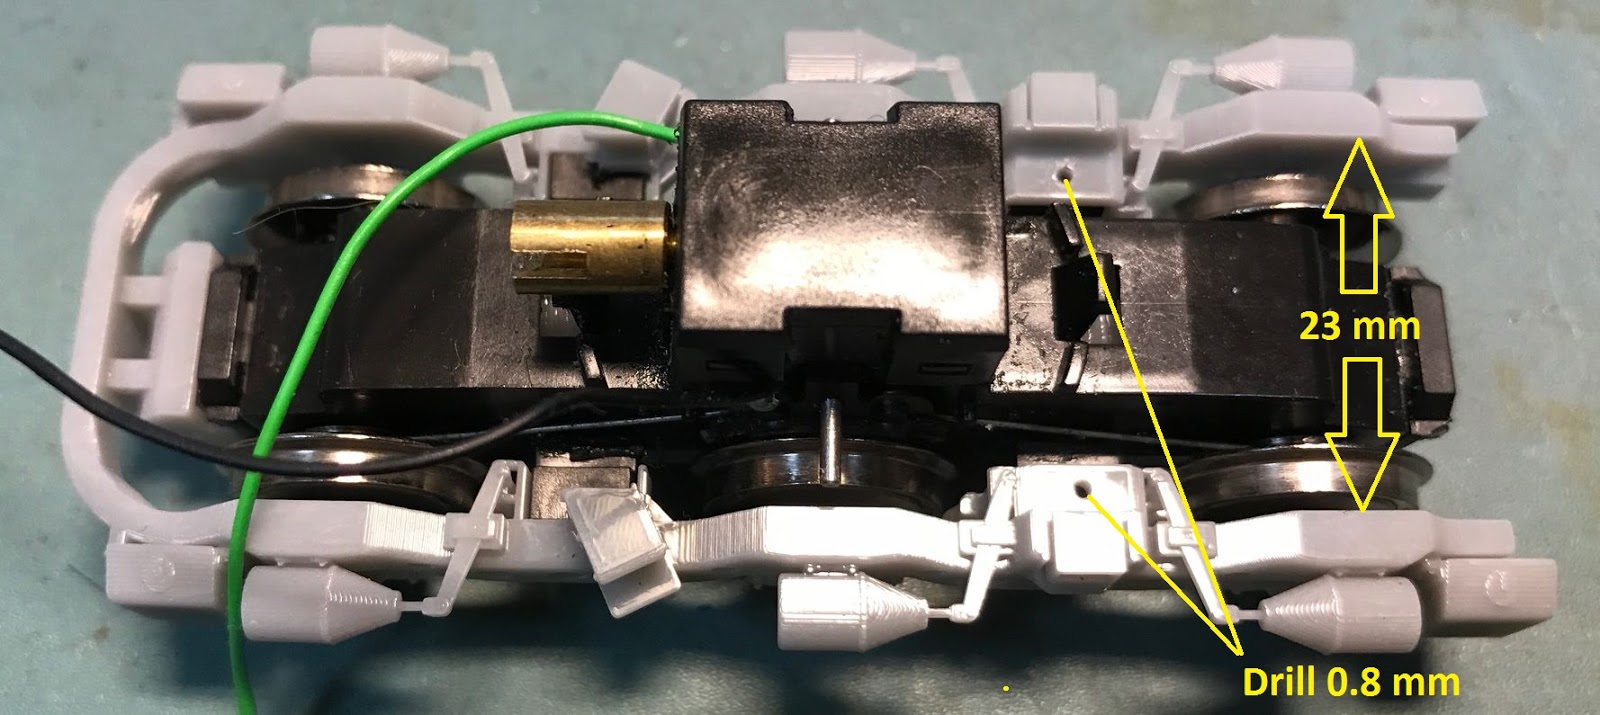
Check that the sideframes are fully engaged with the ViTrains bogie by measuring the distance between the insides of the sideframes. It should measure 23 mm. If the measurement is greater, check that the rectangular holes on the inside of the 3D-printed sideframes are free of supports, and remove any burrs from the cut ends of the ViTrains bogie.
Once satisfied with the fit, gently squeeze the sideframes together while drilling two 0.8 mm diameter holes into the ViTrains bogie frame, using the small holes provided in the 3D-printed sideframes as a guide. Use 1 mm dia. x 3 mm long screws to secure the 3D-printed sideframes in position.
Clip the assembled bogies into the "oval" holes in the underframe. Again, take care with this step to avoid breaking the clips on the bogies. The green wires should be on the left side of the loco.
Clip the assembled bogies into the "oval" holes in the underframe. Again, take care with this step to avoid breaking the clips on the bogies. The green wires should be on the left side of the loco.
Motor and Drive Shaft Installation
Remove the drive shafts and motor clamp from the separate parts "sprue", and clean up the individual parts.
Position the motor in the recess in the underframe, with the wires towards the rear of the loco, and the motor clamp on top. Secure motor clamp in place with four 2-56 screws. After checking that the motor clamp is level, measure the excess length for each screw and trim screws to length, e.g. with a cutting disc in a Dremel or similar motor tool. The remaining screw length should be about 21 mm.
Before refitting the motor clamp, insert the 3D-printed drive shafts into the mating fittings on the bogies and motor flywheels.
Refit the motor clamp and secure with screws trimmed previously.
Rotate the flywheels by hand to check the motor rotates smoothly.
For DCC operation, connect the bogie pickup and motor wires to the DCC decoder in accordance with the decoder wiring instructions. The green pickup wires are equivalent to the red wires (left side) for standard DCC wiring.
Height Above Rail Level
The top of the footplate should be 26 mm above the top of the rails. If necessary, minor adjustments can be made by adding packing (e.g. thin sheet styrene) between the bogies and underframe. Note that the underframe on its own is slightly flexible, so checking of the height should be done with the loco body attached.
At the front end of the loco, packing can be inserted on the underside of the U-shaped bracket which rests on the top of the bogie assembly.
At the rear end of the loco, packing, can be inserted in the crescent-shaped cutouts which rest on the short metal rods protruding sideways from the bogie assembly. Alternatively, the short metal rods can be bent slightly upwards or downwards, taking care that they are the same on both sides so that the loco sits level.
Note that the underframe is designed so that the front bogie can rock slightly from side to side to accommodate minor track irregularities, such as when entering a superelevated curve.
Wiring
For DC operation, connect the 3 green wires to each other and connect the 3 black wires to each other. Verify that the loco moves in the correct direction. The loco should move forward when the left rail is negative and and the right rail is positive - or check the direction against other DC locos. They should all move in the same direction on the same powered section of track.For DCC operation, connect the bogie pickup and motor wires to the DCC decoder in accordance with the decoder wiring instructions. The green pickup wires are equivalent to the red wires (left side) for standard DCC wiring.